RTL Logic Synthesis Tutorial
The following Cadence CAD tools will be used in this tutorial:
- RTL Compiler for logic synthesis.
Computer Account Setup
Please revisit
Simulation Tutorial before doing this new tutorial.
In order to setup your environment to run Cadence applications you
need to open an xterm window and type:
. cadence2009
Running the Cadence logic synthesis tools
Now you should be able to run the Cadence tools.
Never run Cadence from your root directory, it creates many
extra files that will clutter your root.
Instead please create a directory (e.g. cadence, you should have
this already) and another
directory for the design (e.g. tutorial, should have it) and finally
one for the synthesis files (e.g. synthesis):
cd cadence
cd tutorial
mkdir synthesis
cd synthesis
For this tutorial you will need a few extra files,
please download the following file in the synthesis directory
(this is a script that you will have to edit for other designs):
rtl.tcl
from:
http://www.ee.virginia.edu/~mrs8n/soc/files
The command rc -gui (no &) starts RTL Compiler version 8.1 (2009)
in the foreground and you should get the rc startup window:

The window has three areas:
- Menu Bar (top)
- File Browser (left)
- Schematic Browser (right)
Unlike other GUI interfaces, the console this time is
the initial window from which you launched rc (that's why
it had to be launched in the foreground).
Please try to familiarize yourself with the main window,
click on the menus, etc.
For more information on the various Cadence tools I
encourage
you to read the corresponding user manuals. You can get to
the manuals by pressing Help -> Reference Manuals on
the right of the Menu Bar.
Spend some time browsing the manuals
to understand what is available (a lot!). During the semester you will have to
look for information in the on-line manuals to complement the
(limited) info given by these tutorials.
Actually you can think of this
tutorial as a subset of the one available under help!
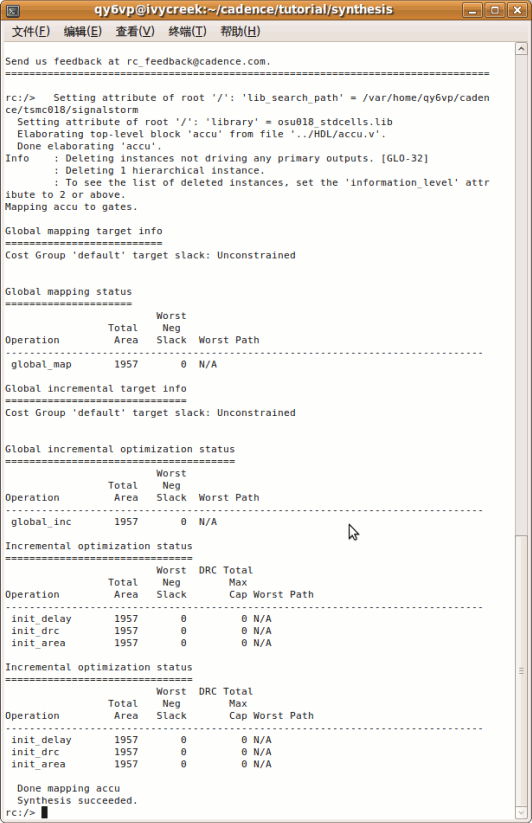
Now we need to run the script that you copied from the files
directory
so go to File -> Source Script from the File menu of
the Menu Bar. Click on rtl.tcl, then OK:

Your console should run for a brief time and you should
get a success message:
Now your GUI window should show a netlist on the right side,
and if you click on HDL, the source code on the left side:

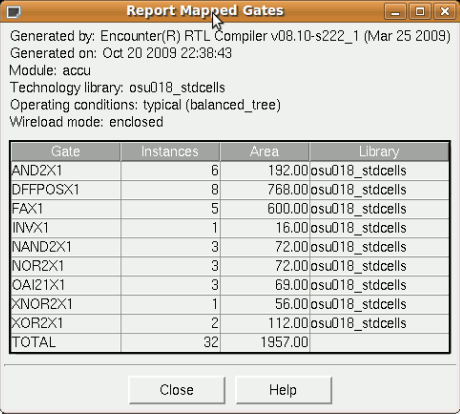
Try some of the menu options, for example you can see what library
standard cells were used in the synthesized netlist
by going to Report -> Netlist -> Mapped Gates...:
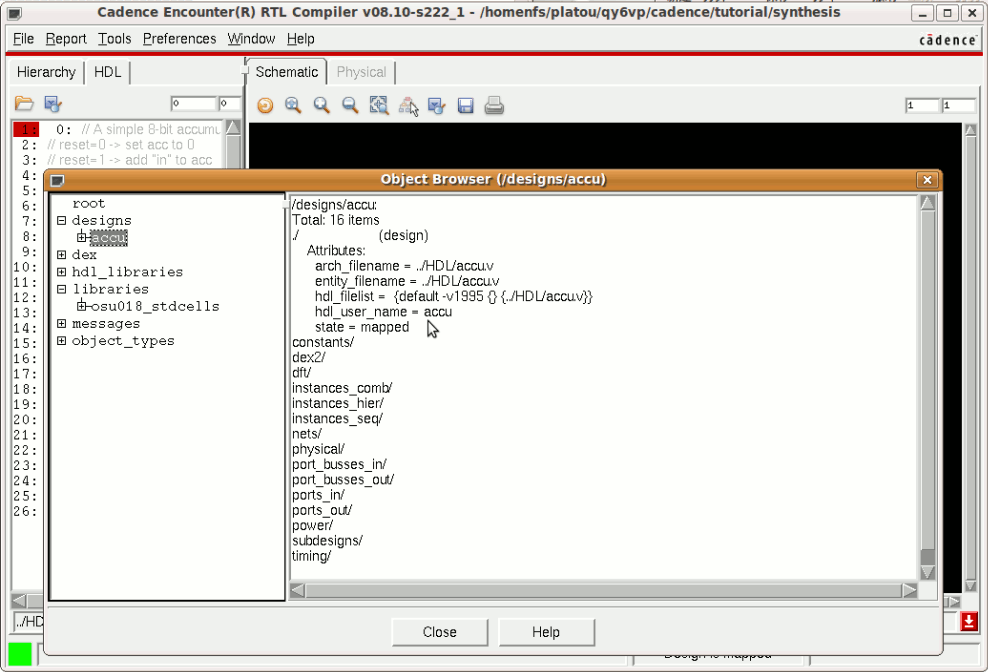
Another important tool is the design browser, go to
Tools -> Object Browser...
Finally, you can close the GUI by going to File -> Exit
and you can now analyze the result of the synthesis in the
file accu_synth.v that you can use for simulating the
netlist and for subsequent place and route using Encounter:

Congratulations, this is the end of the Logic Synthesis Tutorial.